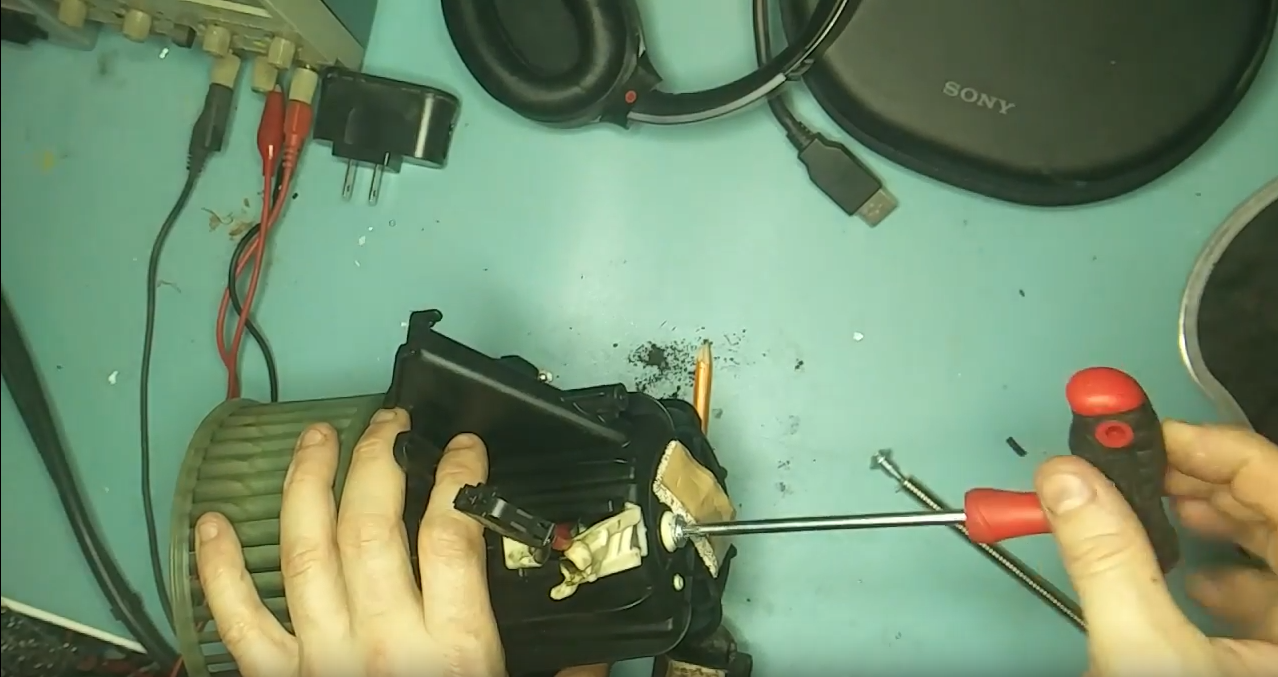
The freehub on the back of my Specialized Hardrock Disc 24 speed (2012) bike is on the way out. It grinds when rotated and was full of rusty water when I sprayed it out with the old WD40. I removed it using a spline and a ratchet from the non-drive side of the wheel.
I re-greased the what I could of the bearings but I reckon its time for a replacement.


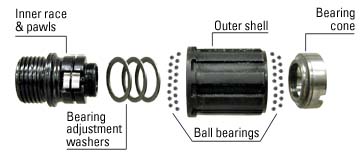
Im pretty sure that these Shimano freehubs are self-contained and have non-replaceable parts. I can just about see the non-drive side bearings on it if I remove the rubber side wall, but there is no obvious way to remove them. I cannot see the drive side bearings at all and again, I can see no obvious way to remove them. Some freehubs have press fitted cartridge ("sealed") bearings, some others have loose bearings. From looking at a photo of a Fast Forward 11 speed hub, https://www.evanscycles.com/fast-for...-body-EV192167, it looks like we can see the red sliver of the side of a bearing cartridge there alright.
I came across a guide on servicing freehubs on the Park Tool website here: https://www.parktool.com/blog/repair...reehub-service . Comparing their images to the one I have, It looks like I have a Shimano or at least a Shimano type freehub. They said the following about these branded hubs:
"The common Shimano® freehub uses internal loose ball bearing, pawls and springs. Be aware that it is not recommend to completely dismantling the freehub itself. There are no parts available, such as the pawls or springs. The small ball bearings are available as replacement parts. However, if the bearings are worn out and require replacing, it is very likely the entire freehub is needing replacement. The blow-up image seen below is a ball bearing type freehub."
I re-greased the what I could of the bearings but I reckon its time for a replacement.
Im pretty sure that these Shimano freehubs are self-contained and have non-replaceable parts. I can just about see the non-drive side bearings on it if I remove the rubber side wall, but there is no obvious way to remove them. I cannot see the drive side bearings at all and again, I can see no obvious way to remove them. Some freehubs have press fitted cartridge ("sealed") bearings, some others have loose bearings. From looking at a photo of a Fast Forward 11 speed hub, https://www.evanscycles.com/fast-for...-body-EV192167, it looks like we can see the red sliver of the side of a bearing cartridge there alright.
I came across a guide on servicing freehubs on the Park Tool website here: https://www.parktool.com/blog/repair...reehub-service . Comparing their images to the one I have, It looks like I have a Shimano or at least a Shimano type freehub. They said the following about these branded hubs:
"The common Shimano® freehub uses internal loose ball bearing, pawls and springs. Be aware that it is not recommend to completely dismantling the freehub itself. There are no parts available, such as the pawls or springs. The small ball bearings are available as replacement parts. However, if the bearings are worn out and require replacing, it is very likely the entire freehub is needing replacement. The blow-up image seen below is a ball bearing type freehub."
This is a pain, as it looks like I have to replace the whole hub. Id rather a more serviceable hub like the Fast Forward one. So ive narrowed my hub down to a Shimano. To recap, I have a 24 speed bike, or to put it another way, a 8 speed cassette. This website https://bike.bikegremlin.com/1259/bi...compatibility/ and this https://cdn.shopify.com/s/files/1/10...tion_Sheet.pdf appear to state that a 9 speed hub is also compatible with an 8 speed cassette
"9 speed cassette has narrower and more tightly spaced sprockets, so it has the same overall width as an 8 speed cassette"
"9 speed cassette has narrower and more tightly spaced sprockets, so it has the same overall width as an 8 speed cassette"
After a bit more research, I found a freehub on this website that listed it as being compatiable with my Specilized bike. The part details are:
Specialized S092100009 Joytech 9-Speed 135mm Q/R Sealed Freehub Body
My bike is 8 speed but from what I read earlier in this thread, the 8 or 9 speed freehubs are interchangeable as they are the same width. This is due to a 9 speed chain being thinner.
I ended up emailing the "regular" bike parts sellers www.wiggle.co.uk and www.chainreactioncycles.com to see if they had it. They all came back to say that they did not have my freehub. So I went with the original website linked above.
When it arrived, it looked pretty much identical to the original.

I installed it and unfortunately found that it wouldn't freewheel The base of it was about .5mm thinner than the the original. This caused it to be mounted too tight against the wheel hub. Luckily, I happened to have a washer from an old table saw that fit. When I sandwiched this between the freehub and the wheel hub and tightened it, it was able to freewheel.

I put the whole wheel back together and the bike has been running great since.
Out of interest, I had another go at opening the old Shimano freehub that I removed. I was able to remove the large rubber washer on the drive side exposing a cap that had a key on either side. I was able to unscrew this with a vice and the tool shown below:


Inside, it was full of rusty water. There were about 20 tiny bearings on each end that looked to be a pain to try and get back together again. The spring on the pawls was rusted and broken. The bearing race channels were pitted. It was unfortunately beyond repair.

Specialized S092100009 Joytech 9-Speed 135mm Q/R Sealed Freehub Body
My bike is 8 speed but from what I read earlier in this thread, the 8 or 9 speed freehubs are interchangeable as they are the same width. This is due to a 9 speed chain being thinner.
I ended up emailing the "regular" bike parts sellers www.wiggle.co.uk and www.chainreactioncycles.com to see if they had it. They all came back to say that they did not have my freehub. So I went with the original website linked above.
When it arrived, it looked pretty much identical to the original.
I installed it and unfortunately found that it wouldn't freewheel
The base of it was about .5mm thinner than the the original. This caused it to be mounted too tight against the wheel hub. Luckily, I happened to have a washer from an old table saw that fit. When I sandwiched this between the freehub and the wheel hub and tightened it, it was able to freewheel. I put the whole wheel back together and the bike has been running great since.
Out of interest, I had another go at opening the old Shimano freehub that I removed. I was able to remove the large rubber washer on the drive side exposing a cap that had a key on either side. I was able to unscrew this with a vice and the tool shown below:
Inside, it was full of rusty water. There were about 20 tiny bearings on each end that looked to be a pain to try and get back together again. The spring on the pawls was rusted and broken. The bearing race channels were pitted. It was unfortunately beyond repair.