Monday, January 21, 2019

Repairing fuel tank cap on Audi A4 B8

When I had the VCDS USB cable hooked up to the car to diagnose the cabin blower error, I came across a second issue. The VCDS software was reporting that the lock for the fuel cap was acting up. A print out of the error was as follows:

Address 46: Central Conv. (J393)       Labels: 8K0-907-064-46.clb
   Part No SW: 8K0 907 064 A    HW: 8K0 907 064 A
   Component: BCM2 1.1      H70 0134  
   Revision: 00002001    Serial number: 010967865308    
   Coding: 0100062000390040012001
   Shop #: WSC 06325 000 00000
   VCID: 2E4A198B2017BC72BDAC28D-807B

3 Faults Found:
02615 - Fuel Tank Cap; Lock 
            009 - Open or Short to Ground
             Freeze Frame:
                    Fault Status: 01101001
                    Fault Priority: 2
                    Fault Frequency: 1
                    Reset counter: 128
                    Mileage: 264877 km
                    Time Indication: 0
                    Date: 2018.12.28
                    Time: 22:48:18

02616 - Fuel Tank Cap; Unlock 
            009 - Open or Short to Ground
             Freeze Frame:
                    Fault Status: 01101001
                    Fault Priority: 2
                    Fault Frequency: 1
                    Reset counter: 128
                    Mileage: 264877 km
                    Time Indication: 0
                    Date: 2018.12.28
                    Time: 22:51:58

It appears thtat the fuel cap was not locking itself. Not really a problem, I mean, who siphons fuel to steal it these days. But it would be good to repair it nonetheless. I needed to have a look at the fuel cap lock to see what was wrong. If you open the cap, you will see a single screw that you can remove on the plastic panel.

Once this is done, using a spudger or blunt knife, remove the plastic panel. You will see the lock module on the left (model 8K0 862153 F). Slide this to the right and lift it out. It will be connected by a red plastic cable. Unclip this on the module side. Now you can remove it from the car.


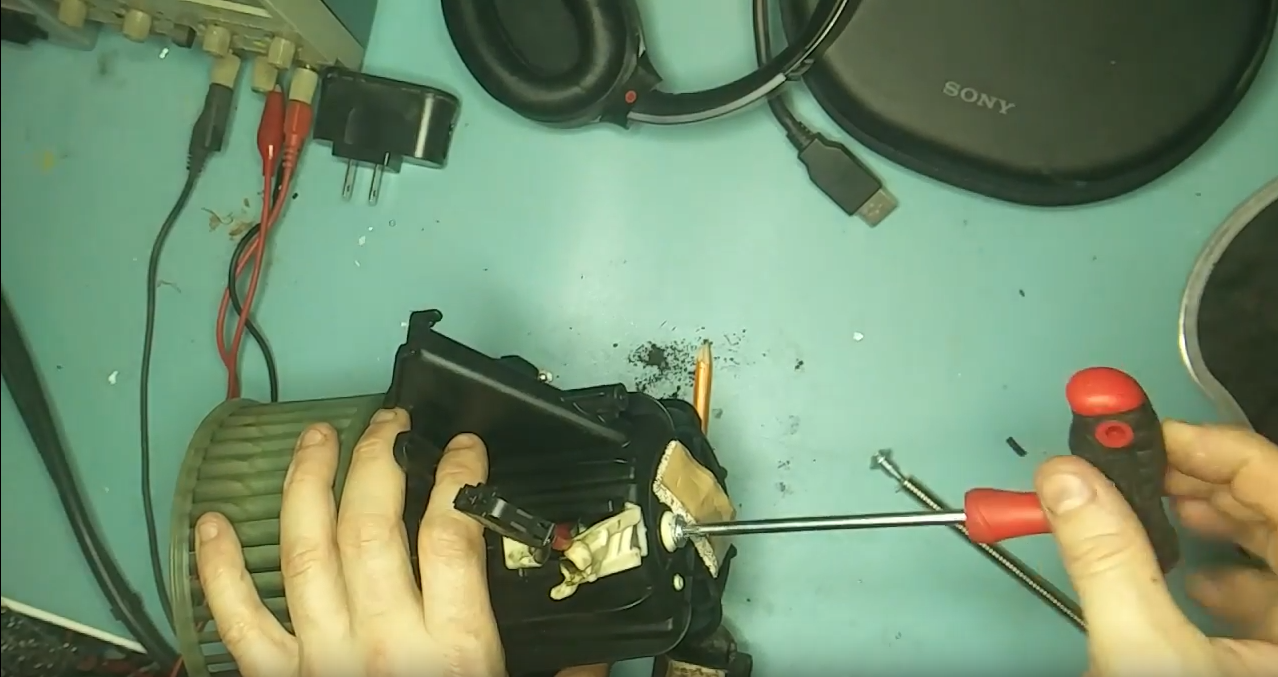
If you are replacing the module, you can just follow the instructions in reverse to put it back in. I opened by module to see what the issue was. There are clips around the perimeter of the module.

Unclip these and remove the cover. Inside is a motor and lock mechanism.

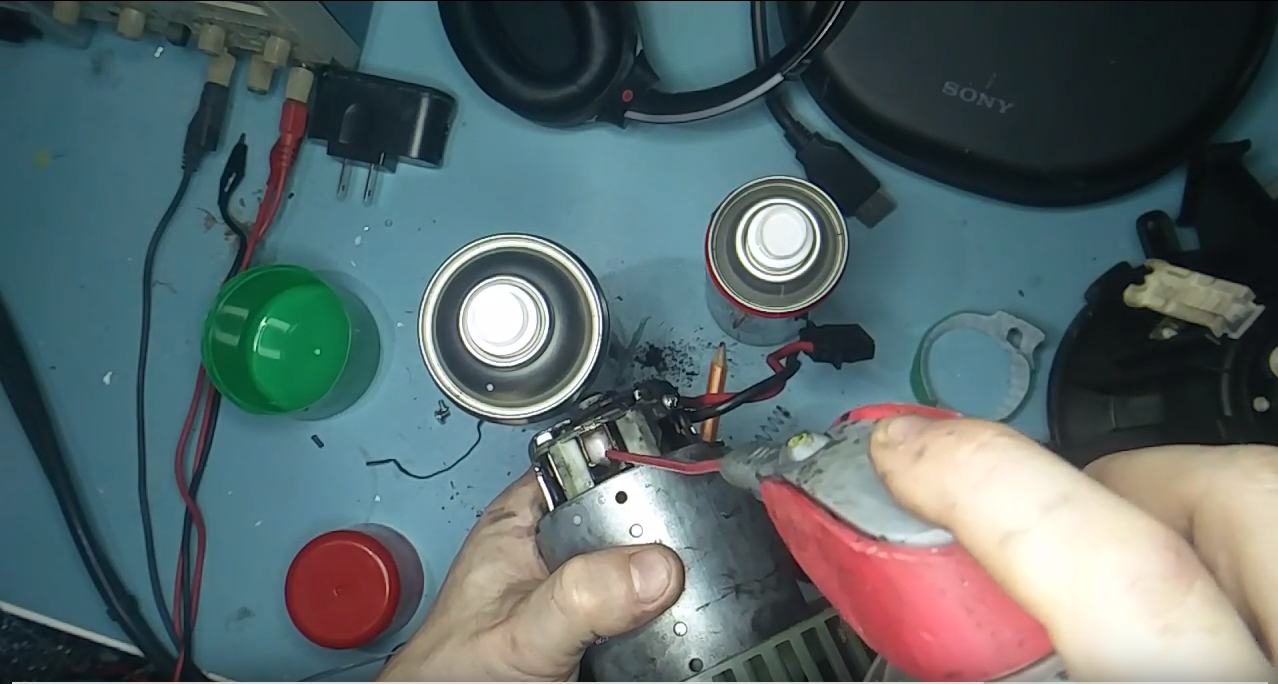
To remove the motor, pull out the two pins in the plug (like above, with a needle nosed pliers) . Then you can wiggle the motor out of the module housing. I removed the motor and attempted to spin it with a 12 v power supply. I would spin, but only after a push. Monitoring the power supply, I notices that it current limiting was it was pulling more than 2 amps at certain angles of the armature. This is a sign that the coil was shorted or burnt out.

I doubt that I would be able to get a similiar motor, and it would be a pain to remove the gear and put it onto a new one, so I just bought a replacement module for about 30e.


Repairing a faulty cabin blower in an Audi A4 B8

While driving I noticed that the fan in the cabin of the Audi A4 was becomming tempermental. 50% of the time when I would press on the button to demist the front windshield it would fail to start up. I hate having to wipe the glass as it leaves streaks, so I was forced to drive with the windows wound down to get enough air through the cabin to clear the glass. Not the safest of options.

I got the laptop out, connected the VCDS cable and ran the software. I got the following error related to the Heating, ventilation, and air conditioning (HVAC) module in the car.

Address 08: Auto HVAC (J255)       Labels: None
   Part No SW: 8T2 820 043 K    HW: 8T2 820 043 K
   Component: KLIMA 1 ZONE  H05 0120  
   Revision: B0000000    Serial number: 0126.02.080837
   Coding: 34040000
   Shop #: WSC 06325 000 00000
   VCID: 3A6225DBEC5F60D2112454D-806F

2 Faults Found:
01273 - Fresh Air Blower (V2) 
            003 - Mechanical Failure - Intermittent
             Freeze Frame:
                    Fault Status: 00100011
                    Fault Priority: 3
                    Fault Frequency: 55
                    Reset counter: 179
                    Mileage: 264877 km
                    Time Indication: 0
                    Date: 2018.12.29
                    Time: 16:27:51

             Freeze Frame:
                    Temperature: 11.0°C
                    Speed: 0.0 km/h
                    Load: 0.0 %
                    Load: 8.5 %

01273 - Fresh Air Blower (V2) 
            006 - Short to Plus - Intermittent
             Freeze Frame:
                    Fault Status: 00100110
                    Fault Priority: 3
                    Fault Frequency: 14
                    Reset counter: 179
                    Mileage: 264877 km
                    Time Indication: 0
                    Date: 2018.12.29
                    Time: 16:27:53

             Freeze Frame:
                    Temperature: 11.0°C
                    Speed: 0.0 km/h
                    Load: 0.0 %
                    Load: 32.5 %
                    Voltage: 11.60 V

Googling keywords from the issue informed me that the fan/blower motor had to be replaced. New, this part is about 120e off ebay. To do this, I would need the part number to look for. So I would have to take it out to have a look at it.
I roughly followed this guide here to remove the glove compartment. https://www.youtube.com/watch?v=9d3zL-7kJBQ Note, some guides will advise you to remove the Radio to get at some bolts. I did this, but found that there were no bolts that needed removing. So dont do that.
there are about 5 screws to remove from the glove compartment. Two on top, about two on bottom, and one under the panel to the left of the compartment inside the door. Once removed, you will need to disconnect a cable going from the car to the airbag enable/disable switch in the glove compartment. Once this is removed, put the glove compartment aside. You will see the power resistor for the fan and the fan itself. One screw holds the fan. Remove this, and then with two hands, firmly twist the fan housing to remove the whole fan. The blower/fan will look like the following:

I cleaned out the cage for any debris. I spun the fan by hand and found that it was very stiff, only spinning for less than one second before stopping again.


I hooked it up to a 12v power supply limited at 2 amps and found that it turned slowly.


Looking at the part number, it is 8k2 820 021. This is not meant to be a user serviceable part, but as I had nothing to loose, I decided to open it.
I removed the back cover, it is held in place by two screws


I bent back the two copper gates holding spring for the carbon brushes in place. This allowed me to remove the spring and spray some WD40 into them to make sure that they came in and out freely. The brushes had about half their life left. Leave the springs out along with the brushes pulled out.
I then sprayed the bushing closest to the cage too
Next, I decided to have a look at the rear bearing and the commutator. To do this, we have to remove the back piece of metal covering the rear bearing. This is held in place against the main housing by a few crimps in the metal. These can be teased up by a flat screwdriver. Unfortunately, I do not have any photos or video of this.
You will now be able to see the commutator. You can see that there is alot of carbon buildup on the copper, along with wear patterns from the brushes.

This can be cleaned with a bit of sandpaper. I put the cage end into the chuck of an electric drill, held the sandpaper against the commutator, and spun it to smooth and clean it.

Then I used a dental pick to clean between the copper contacts on the commutator for any bits of copper or carbon that might short it.

The rear bushing got spray of wd40 too. I pressed the rear metal housing back into place again. This will require a few goes and some patience. A few taps of a small hammer bent the crimps back into place.

Screw the rear black plastic housing back into place again. I tested it with the power supply again and it appeared to spin with more speed. Manually spinning the cage resulted in it continuing to spin for 2-3 seconds before coming to a stop. Not great, but definitely better than before.

I installed it back into the car. VCDS along with the cable was used to reset the all errors on the car. After a month of use, the fan works now as expected, and there are no errors showing up on VCDS. Success! 

Friday, November 25, 2016

Repairing Audi A4 B8 8K door not unlocking with remote fob

When you buy a pretty premium saloon, you would expect reliability. However, I have found that the german engineering of the Audi a bit underwhelming in terms of both reliability and ease of repair. Too often, small little niggley things have given up the ghost on the A4. The latest to go was locking mechanism on the drivers side door. When I tried to unlock the door with the remote key fob, the door made made a grumble but failed to unlock. It would require a second press of the fob to unlock the door, or else it wouldnt open at all. Instead, I would have to roll down the windows with the fob and open the door by reaching in and opening it from the inside.
I also noticed that the automatic locking of the door when the vehicle went over 30kph was making a strange noise on the drivers side.

I tried a few different solutions outlined on the various forums:

  • Pull the outside and inside handle at the same time until you feel it click: This appeared to work for a while, but failed again. 
  • Spray WD40 over all the moving parts including lock tumbler and handle cable: No effect
  • Dismantle door lock module and grease all parts: no effect
Using the VAG-COM VCDS diagnosis software and cable, I found a that the door lock module was throwing a "outside limit" error. Worse again, after a while, the issue appeared in the passengers side door too. Due to the noise that the locking mechanism made, I suspected the door motor. As such, I removed the trim and then the paneling of the door. There are about 6 torx screws that you have to remove to unfasten the paneling. Then you have to start pulling out the panel from the bottom. once you get the top, you can lift it upwards to remove it. Next, you can remove the blue internal door handle cable by unhooking it from the door handle side. Once that is done, you have to remove the outside door handle cable from the lock module. Reach into the door frame and twist the yellow catch on the end of the cable going into the door lock module. Next, remove a rubber gromit on the edge of the door frame to expose a grub screw securing the lock tumbler. Loosen this, and pull out the lock tumbler from the outside. Then to remove the door lock module, you will have to remove two large bolts from the outside edge of the door frame. Then you can reach in and remove the loosened door lock module.

Take the module to your work bench and remove all the screws on the outside. Open up the small gray hatch window. You will see two axels coming out from the main housing into the locking mechanism. Insert a flat screwdriver and prise the axels from the lock mechanism. You will be left with just the main housing. Using a spludger tool, prise the two half of the housing apart. Inspect the two halves when apart- if the water proof gromit has come loose, press it back into place.

Inside, you will see the two motors of the module. Remove the largest. Clean the two contact that insert into the motor. I used some fine (2000 grit) sandpaper. At this stage, I tested the motor using a 12v supply and found that it struggled to turn without help. There was obviously something wrong with it. Using a small screwdriver, lift the two tabs on the end of the motor. You can then prise the end off the motor. There was much carbon dust in the motor from the brushes. As such, I tapped the motor on the desk to knock it out. The commutator on the motor was blackened from the brushes. Again, with the fine grit sandpaper, this was quickly cleaned up. You can remove the brushes with a sim card removal tool. I cleaned these up with a small rag. I put the motor back together and tested it with a 12v supply. It ran perfectly.

Finally, you can put everything back again. Using the VAG-COM VCDS diagnosis software and cable, I reset the error codes. I tested the door, and it worked perfectly!. A month later and it still hasnt given any problems or caused errors in VCDS.

Note: I had a second door stop unlocking that the guide above did not repair. Instead, I had to replace the "bowden cable" to fix this. You can see it in the photos below with the sky blue rubber around it. It appears That these do not move smoothly enough after a few years to allow the lock to reset back to its previous position.