I have spoken in a previous blog post about some issues with Apple hardware design
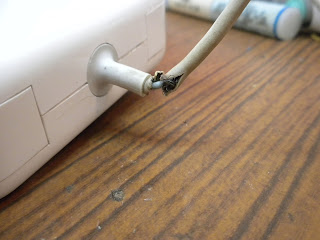
here. To briefly recap, it is of my beleif that in general, Apple hardware is very well designed. However, they often overlook functionality in favour of form, sacrificing important aspects such as durability so that "it looks nice". A good example of this is the Magsafe adapter. In a bid to improve aesthetics, Apple shortened the rubber strain-relief grommet that protects the power cable from fraying at the charger end, and the connector end to the laptop. The metal strands inside the cable gradually begin breaking from normal use until eventually, with only a few strands left carrying a large amount of current, the last few strands overheat resulting in a burning smell and the the connection breaking completely. After Apple received many complaints with regard to this problem with the original Magsafe adapter, they extended the length of the rubber on the grommet to improve the durability of the cable. However, in me experience, this wasnt enough: the cable still ends up fraying, and the hardening of the rubber in the grommet over time only aggravates the issue. They also introduces a replacement program, details of which you can find
here. However, this does not cover anywhere outside of the United States.
In case you find yourself in a similar situation as I was, here is a short guide on how to repair the cable on your magsafe adapter, without having to fork out the $80 for a new one.
First off, you will need a large pliers, a high wattage soldering iron (I used a weller 75watt), solder, some cable ties of various sizes, a drill and a small drill bit, some glue and a sharp knife.
1. Remove the plug from the Magsafe adapter.
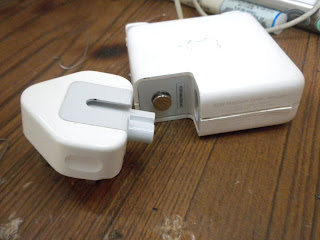 |
| Removing the plug from a Magsafe adapter |
2. Apple have ultrasonically welded the two plastic shells that cover the adapter. They do this by vibrating the two halves against other at such a high rate to melt the plastic at the junction and thus sticking them together. This results in the Magsafe adapter being pretty difficult to open without making some messy cuts in opening it up. So here is a quick tip on opening them up: Flip open the cable tidy arms and insert the pliers into the gap. Then slowly and firmly open the pliers pushing the two parts of the case apart in the process.
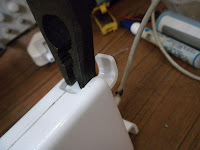 |
| Insert a pliers in the gap for the cable tidy |
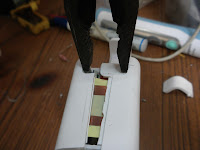 |
| Open the pliers, splitting the case open |
Voila! An opened magsafe adapter with very little tool marking or scratching to the plastic.
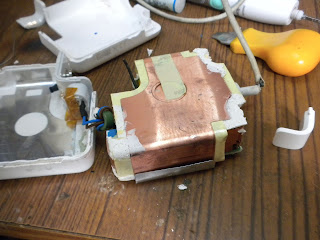 |
| Opened Magsafe adapter |
3. Now, bend some of the plastic and copper shielding back around where the cable meets the circuit board to reveal two large solder points. Make a note of where the black cable and the white cable are soldered into the board. To help you, the board should be marked "GND" near the black cable.
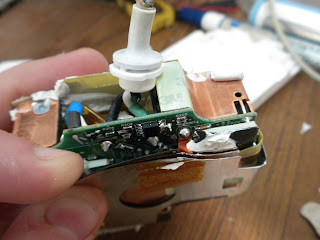 |
| Solder points for Magsafe cable. White is positive, black (GND, cable shield) is negative |
4. Using a high power soldering iron, desolder the two points and gently pull the cable from the board. You may find it easier to solder the points by removing the shielding from the circuit board. I left it on here.
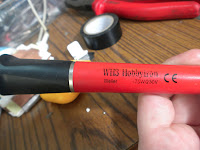 |
| Weller 75w iron |
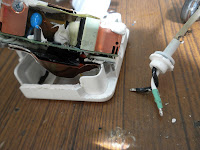 |
| Cable successfully desoldered from Magsafe adapter |
5. Taking the cable, use a sharp knife to make a cut after the break in the cable.
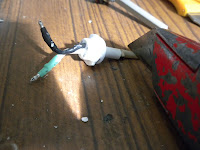 |
| Cutting the good cable from the damaged cable |
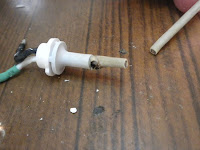 |
| The damaged part ad grommet removed from the cable |
6. Now, using the pliers again, pull the old black wire, and the white wire out of the grommet. You will be left with a hole in the grommet as shown below.
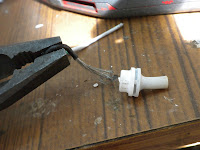 |
| Removing the wires from the damaged part of the cable |
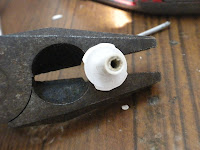 |
| The grommet, with the outside insulation of the cable left |
7. Now, drill a hole all the way through the grommet removing the old cable and some of the grommets plastic along the way. You should make the hole large enough to pass the cable through, as shown below.
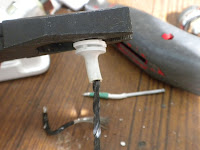 |
| Drilling the outside insulation of the damaged cable from the grommet |
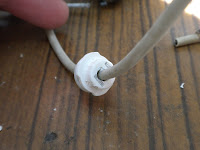 |
| Weaving the good cable through the now cleared hole in the grommet |
8. After you have passed the cable through the grommet, it is time to prepare the cable for soldering back to the board. Using the sharp knife, remove about 20mm of rubber insulation from the cable.
Further remove about 3mm of insulation from the inner white wire. Then tin the ends of both cores using the soldering iron as shown below.
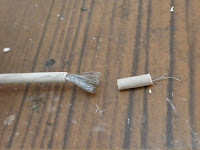 |
| Removing some outside insulation from the good cable |
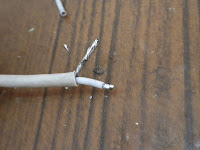 |
"Tinning" i.e. applying solder to the exposed positive and negative cable.
A good tip here is to twist the ends before soldering. |
9. Now, carefully solder both wires back to their respective points on the Magsafe circuit board.
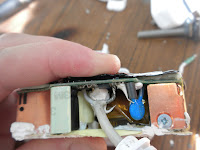 |
The ends of the cable correctly soldered into place
on the circuit board. |
10. Place the circuit board back into one of the plastic shells of the cover. If you have done everything correctly so far, the adapter should be able to charge your laptop as this stage. If you are comfortable testing the adapter while the cover is off, do so now. Or else continue with the guide.
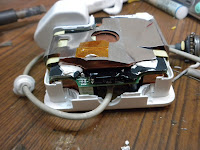 |
| Placing the circuit board back into one of the covers |
11. Using a small cable tie, wrap it around the cable as tight as you can just inside the plastic cover. This is done so that the cable cannot be accidentally pulled out of the adapter during use.
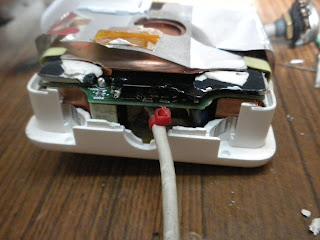 |
| Adding a cable tie to the good cable |
12. Run the plastic grommet down the cable back into position in the plastic shell.
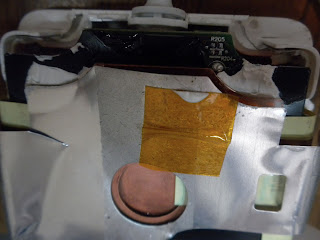 |
| Placing the grommet back into the shell |
13. Using some glue, make a small bead all around the perimeter of the shell. Use the glue sparingly, but cover all the edges where both halves meet.
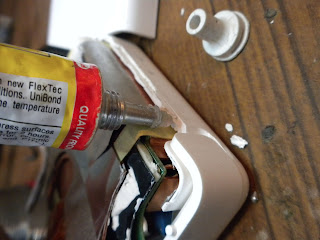 |
| Adding glue to the edge of the shell |
14. Press the second half of the plastic shell back onto the Magsafe adapter. Wriggle the two halves to get them into place properly, and then firmly press the two halves back together.
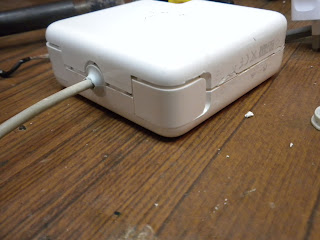 |
| Squeese the two halves together to make sure that the glue spreads. |
15. Using some large cable ties, wrap them around the Magsafe adapter and tighten them using a pliers. You will need the two halves to be very tight together as the glue dries, or else the two cable tidy arms can fall out.
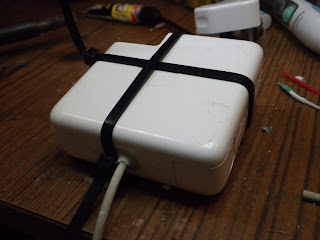 |
| Adding cable ties around the adapter to make sure that they glue together properly. |
16. When the glue has dried, remove the cable ties. You should be left with a working adapter that hardly looks like it was opened at all!
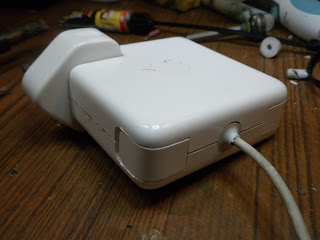 |
| The finished, now working, adapter. |
Unfortunately I accidently ripped some of the rubber off the grommet as I was drilling through it, so go easy on that drilling! I have also repaired a few adapters where the cable has broken and burnt on the connector end. This is a slightly more difficult repair, but I can make a guide if requested.
 I have spoken in a previous blog post about some issues with Apple hardware design here. To briefly recap, it is of my beleif that in general, Apple hardware is very well designed. However, they often overlook functionality in favour of form, sacrificing important aspects such as durability so that "it looks nice". A good example of this is the Magsafe adapter. In a bid to improve aesthetics, Apple shortened the rubber strain-relief grommet that protects the power cable from fraying at the charger end, and the connector end to the laptop. The metal strands inside the cable gradually begin breaking from normal use until eventually, with only a few strands left carrying a large amount of current, the last few strands overheat resulting in a burning smell and the the connection breaking completely. After Apple received many complaints with regard to this problem with the original Magsafe adapter, they extended the length of the rubber on the grommet to improve the durability of the cable. However, in me experience, this wasnt enough: the cable still ends up fraying, and the hardening of the rubber in the grommet over time only aggravates the issue. They also introduces a replacement program, details of which you can find here. However, this does not cover anywhere outside of the United States.


You might be able to use a little Sugru to add back some of the strain releif functionality....
ReplyDeleteGreat idea, I might try this next to improve on the Apple design. Also, adding a spring or cable shrink may also work well.
DeleteIf you notice the damage as soon as it starts (or before it's completely broken) you can fix it and prevent further damage.
DeleteI use the repair kit from FixaCable.com.
You can find it here: http://fixacable.com/products/magsafe-cable-repair-kit-2-repair-tubes-available-with-free-shipping
It's quick, easy and works very well! Plus you can save money!
Can I use electric duck tape instead?
DeleteNice job, well documented. Would a small plug/socket not reduce the need to do it again?
ReplyDeleteYes, a good idea. I would make repair easier alright. It would alos allow you to add power adapters for different laptops too.
DeleteSince you mentioned it, I actually have a ''broken'' power supply that a friend gave me that is frayed and was shocking her on the magsafe connector end, as I was reading this I was trying to figure out how to apply your process to the itty bitty cracking thing!
ReplyDeleteI would love to fix the adapter so I have one less bit of ''useless'' clutter around :)
Also, excellent guide that was very easy to follow and understand!
DeleteThanks! Im glad it was easy to follow. Yes, I have repaired a number of Magsafe adapters at the laptop connector end. It is not as easy, but I will have to write up a guide at some stage.
DeleteHi !!!
ReplyDeleteI don't have apple product but I still liked your tutorial !!!! I'm sure it'll be handy for some of my friend !! Thanks for them !!
Anyway, I'm frenchy so my point is just : viola is actually spelt voila !!!
You know how frenchies can be arrogant !! Don't take it personal !!!
Hope you learnt something !!
Bye !!
Ahahaha, my apologies, I will have to correct that spelling mistake. My french teacher would kill me if she saw it...
DeleteAwesome thanks, just followed your guide and it worked perfectly, saved me loads of money!!!
ReplyDeleteGood to hear! Im glad it worked out for you.
DeletePersonally I hate apple. Yes I have tried apple products from ipads and iphones.... I never liked them, though I don't like the Androids either, sadly I am a BB guy. But What I do have to tell you is that this tutorial, though I am not a apple person, is a great one. It does give me ideas and other thoughts on how to fix things, and then repairing it(as well as my neighbors problems with their apple products *rolls eyes*) since they have the same problems as well like you did, now I know, and I can actually safely do it since I have all the supplies and abilities to do this. I just have to say good job and keep up the good work.
ReplyDeleteBTW YES on the 2nd tutorial, 2 of my neighbors have that connector side frayed and broken, one looks burnt, but it still seems to work. Since I don't fix apple things I would like to know how so I can fix it.
Thanks for the good feedback! Yes, I will have to write up a tutorial on repairing the laptop connector end of the magsafe adapter. I will just have to get a hold of a broken adapter to get the photos from.
DeleteLooking forward to seeing the laptop connector end repair instructions. Thanks Warren! T Void!
DeleteThank you for to sharing this informative idea that how to repair an Apple Magsafe charger. It’s true that all the times we cannot reach to the technician for repairing the electronics products. Then we need to repair ourselves. It needs some tactics which is given here. Thanks again. If you need technician for repairing service then you can contact with Gromtec Europe Limited.
ReplyDeletethanks for share....
ReplyDeleteHey, thanks for putting this together, very helpful.
ReplyDeleteI'm in the middle of doing a 85W adapter (ADP-85EB T V85), and there is a complication desoldering the white wire from the board. It looks like there is a metal crimped post that is on the board, and the white wire is in that (with a green heatshrink). Made it a bit trickier to get the wire out.
Oh, and there was a metal bit inside the strain relief part. Probably another crimp.
DeleteAre you aware of http://www.instructables.com/id/MacBook-Mag-Safe-Charger-Budget-Repair-Disas/ ?
Deleteanybody have a fix for when one of the pins doesn't pop back out all the way on the end that plugs into the computer? It's not stuck all the way in, just doesn't come out quite far enough to make the connection, and can be pulled out with tweezers but pops back in part way.
ReplyDeletewhat if you just use duct tape ? does it work ? or is it sort of kinda dangerous at some point ?
ReplyDeleteseems to use for me but i'm no technician so i dunno if the ductape touches the shiny cables inside the white thing if that's ok or not. Anyway that's what i did, took me less time than the time it takes if you actually read ths tutorial (which you might guess, i didn't).
So ? anyone will tell me if it works or if i'm gonna fry all my hardware ?
thx ;)
Great article! Saved my day. Just a little force and a whiff of solder and all is back working again. Beats the burning smell from last night when the cable finally frayed and shorted out.
ReplyDeleteWhen you get the time, please please please write that tutorial for fixing the other end of the cables! I currently have TWO of those crappy Macbook power adapters, both broken at the end where they attach to the laptop.
ReplyDeleteFrankly, I won't be buying another Apple laptop when this one dies. Marketing a laptop as being great for frequent travelers like they do with the Macbook Air, and then shipping it with an adapter that won't actually survive being carefully wound up and packed safely in a bag every few days or weeks, is not kosher.
But as long as the laptop itself still works, I'm gonna try to keep the TWO power adapters I already have going; no way in hell am I paying Apple $90 for another one! And your tutorial looks a whole lot better (and more effective) than my current half-roll of electrical tape solution... ;)
thanks man i really appreciate it!!!
ReplyDeletei saved 80 bucks for a defective overpriced charger
Best "How to do it" post I've seen! I took the sheilding off completely so I could get at the soldered bits more easily but wish I hadn't. I touched something and got a nasty shock even though the charger hadn't been plugged in for a week or so. Not sure what but probably one of the capacitor terminals. Ouch. By the way, it might be worth reading this first: http://support.apple.com/kb/HT4117
ReplyDeleteAwesome! for those in a hurry, and without soldering iron, the redneck way...
ReplyDeleteStrip the cables, twist them together 1 by 1, secure with (you guessed it) duct tape, ziplock to immobilize the cable.
This comment has been removed by a blog administrator.
ReplyDeleteHey, man! I just wanna thank you for this amazing tutorial. You saved me quite a few bucks! Cheers!
ReplyDeletethanks for this awesome tutorial
ReplyDeletei will try to repair my broken cable,
thkc
nice article! I am looking for wires and cable Philippines topic!
ReplyDeleteYou guys allow it to be quite simple for all your folks available.
ReplyDeletePortable cord
Hi! I'm tempted to doing it, but Apple support says repairing the cable may result in current overload and damaging the computer?
ReplyDeleteI have spoken in a previous blog post about some issues with Apple ... 2imacair.blogspot.de
ReplyDelete
ReplyDeleteotr214427
INTERNATIONAL CONCEPT OF WORK FROM HOME
Work from home theory is fast gaining popularity because of the freedom and flexibility that comes with it. Since one is not bound by fixed working hours, they can schedule their work at the time when they feel most productive and convenient to them. Women & Men benefit a lot from this concept of work since they can balance their home and work perfectly. People mostly find that in this situation, their productivity is higher and stress levels lower. Those who like isolation and a tranquil work environment also tend to prefer this way of working. Today, with the kind of communication networks available, millions of people worldwide are considering this option.
Women & Men who want to be independent but cannot afford to leave their responsibilities at home aside will benefit a lot from this concept of work. It makes it easier to maintain a healthy balance between home and work. The family doesn't get neglected and you can get your work done too. You can thus effectively juggle home responsibilities with your career. Working from home is definitely a viable option but it also needs a lot of hard work and discipline. You have to make a time schedule for yourself and stick to it. There will be a time frame of course for any job you take up and you have to fulfill that project within that time frame.
There are many things that can be done working from home. A few of them is listed below that will give you a general idea about the benefits of this concept.
Baby-sitting
This is the most common and highly preferred job that Women & Men like doing. Since in today's competitive world both the parents have to work they need a secure place to leave behind their children who will take care of them and parents can also relax without being worried all the time. In this job you don't require any degree or qualifications. You only have to know how to take care of children. Parents are happy to pay handsome salary and you can also earn a lot without putting too much of an effort.
Nursery
For those who have a garden or an open space at your disposal and are also interested in gardening can go for this method of earning money. If given proper time and efforts nursery business can flourish very well and you will earn handsomely. But just as all jobs establishing it will be a bit difficult but the end results are outstanding.
Freelance
Freelance can be in different wings. Either you can be a freelance reporter or a freelance photographer. You can also do designing or be in the advertising field doing project on your own. Being independent and working independently will depend on your field of work and the availability of its worth in the market. If you like doing jewellery designing you can do that at home totally independently. You can also work on freelancing as a marketing executive working from home. Wanna know more, email us on workfromhome.otr214427@gmail.com and we will send you information on how you can actually work as a marketing freelancer.
Internet related work
This is a very vast field and here sky is the limit. All you need is a computer and Internet facility. Whatever field you are into work at home is perfect match in the software field. You can match your time according to your convenience and complete whatever projects you get. To learn more about how to work from home, contact us today on workfromhome.otr214427@gmail.comand our team will get you started on some excellent work from home projects.
Diet food
Since now a days Women & Men are more conscious of the food that they eat hence they prefer to have homemade low cal food and if you can start supplying low cal food to various offices then it will be a very good source of income and not too much of efforts. You can hire a few ladies who will help you out and this can be a good business.
Thus think over this concept and go ahead.
Awesome post.
ReplyDeleteValuable and interesting information.
Thanks for sharing with us.
Laptop Repairs
Harga laptop apple macbook pro
ReplyDeleteHarga laptop apple macbook air
Hi, thank you for this article. I have a question: which kind of glue is appropriate for the step 13? I'm afraid of the heat when Apple Magsafe charger will works again. I need a particular thermal glue I guess... Have a good day!
ReplyDeletethe materials you buy for this cost more than a new charger...
ReplyDeletethank you guys...this is tutorial has been so helpful for me
ReplyDeleteJust wanted to say, THANK YOU SO MUCH. Despite the fact that I had never used a soldering iron prior to this, my once severed charger is now whole and working again thanks to this tutorial! And it even still looks decent, which is a huge plus. Thanks for saving me from buying a new $80 charger from Apple...my only cost was the $2.49 bottle of superglue, which I was a huge fan of for this project.
ReplyDeleteI have the same issue with my MacBook Pro charger (15", end 2011).
ReplyDeleteI requested a new charger from the Apple Store (Lille, North of France); they refused.
I requested them to open the charger; they refused.
I wanted to buy a cable (in order to replace myself); they refused.
They only suggested to buy a new charger: 89 euros here !
I REFUSED.
For now, I have just solded the wires, outside...
I will try to open the charger later; thanks for your guideline.
You shared so great tips! Thank you so much. I wish i new it earlier. I have this adaptor http://hardware.nl/power-supply/dell/450-18650.html and it was broken. I didn't know what to do , so just paid money and buy new one! It is so pity, cause I could fix it and don't waste my money!
ReplyDeleteOnce you’ve got the right charger for your gadget of choice, the next consideration is the power source. While most sources provide sufficient power, some – like the USB port on a computer – won’t provide enough, even if you’re using the perfect Charger.Internally a charger is an amazingly compact switching power supply that efficiently converts line AC into 5 volt DC output. The input AC is first converted to high-voltage DC. The DC is chopped up tens of thousands of times a second and fed into a tiny flyback transformer.
ReplyDeletemerci beaucoup, un tutoriel qui m'a bien servi
ReplyDeleteGod job and work fine. I save ones of my daughter !
ReplyDeleteThank you so much. I just repair mine today.
ReplyDeleteFred from France.